

Getting started with Mailmodo via Whop
Last updated November 17, 2025
This article serves as a getting started guide if you've purchased the Mailmodo Pass via the Whop Marketplace.
Welcome to Mailmodo. We are thrilled to have you here. Mailmodo helps businesses provide better, more tailored, and engaging client experiences. Because we believe that good experiences feel like one-on-one discussions are key to a successful relationship. We're here to help you.
To make it super easy for new users, we have created this guide that talks about the steps you need to take to set up your Mailmodo account, create a template, and start sending campaigns.
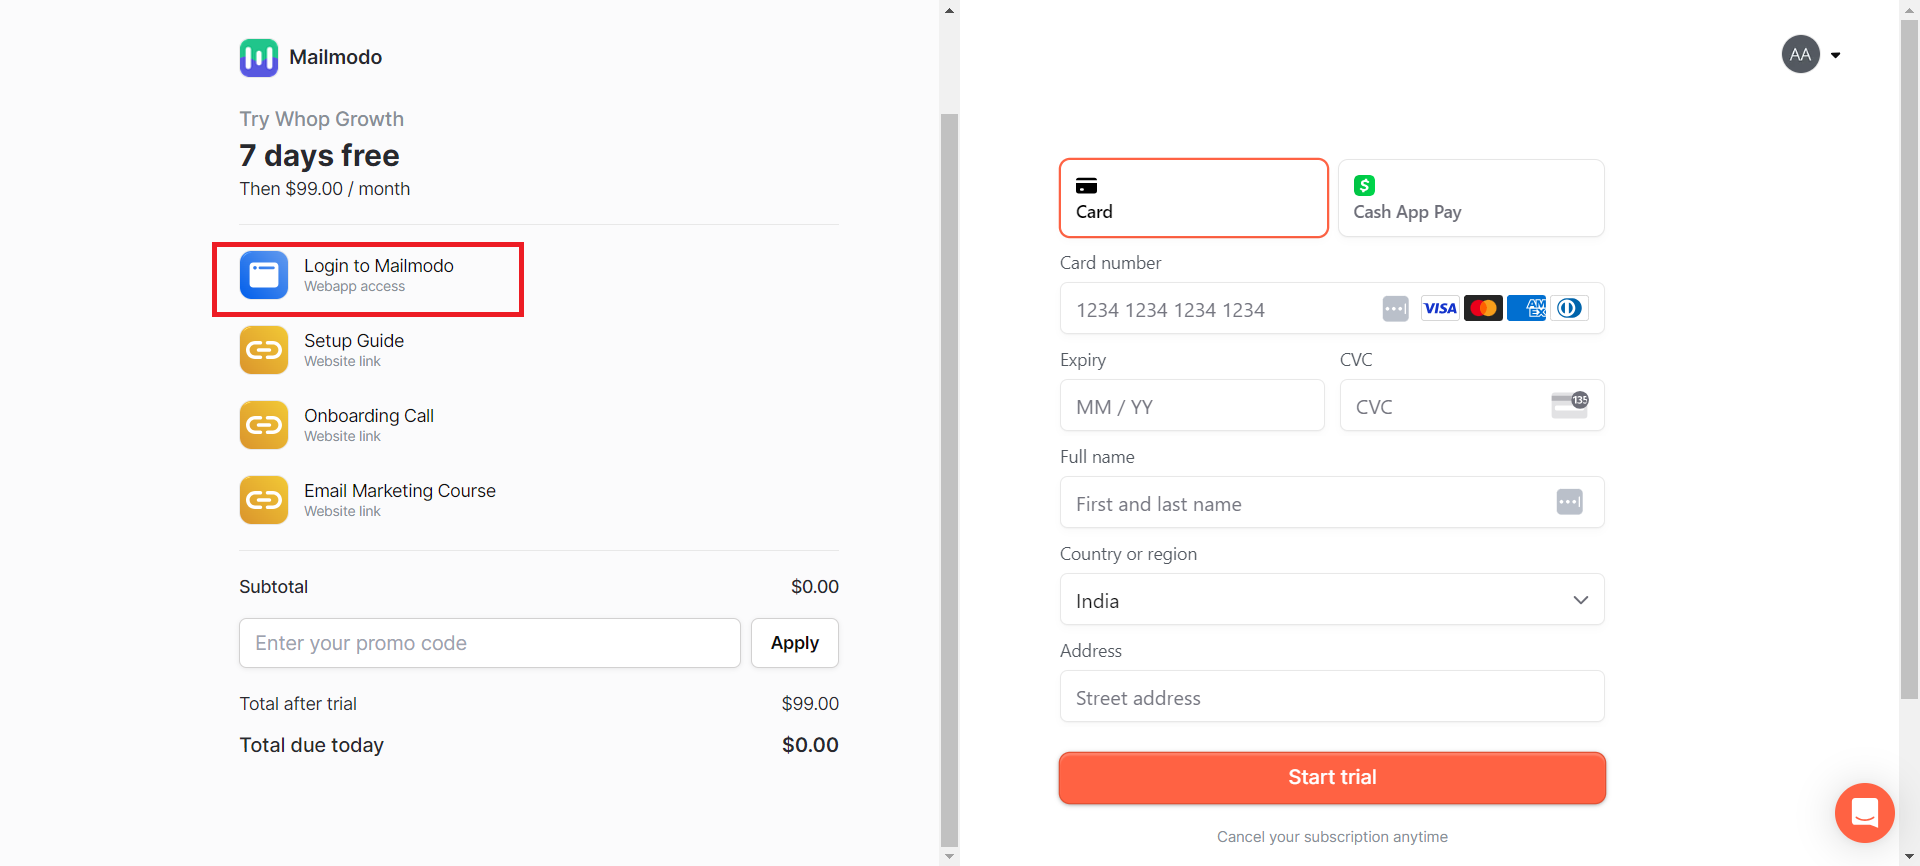
1. Login on the Platform
Go to MyHub in Whop and click on Login to Mailmodo from your perks for logging in to Mailmodo.
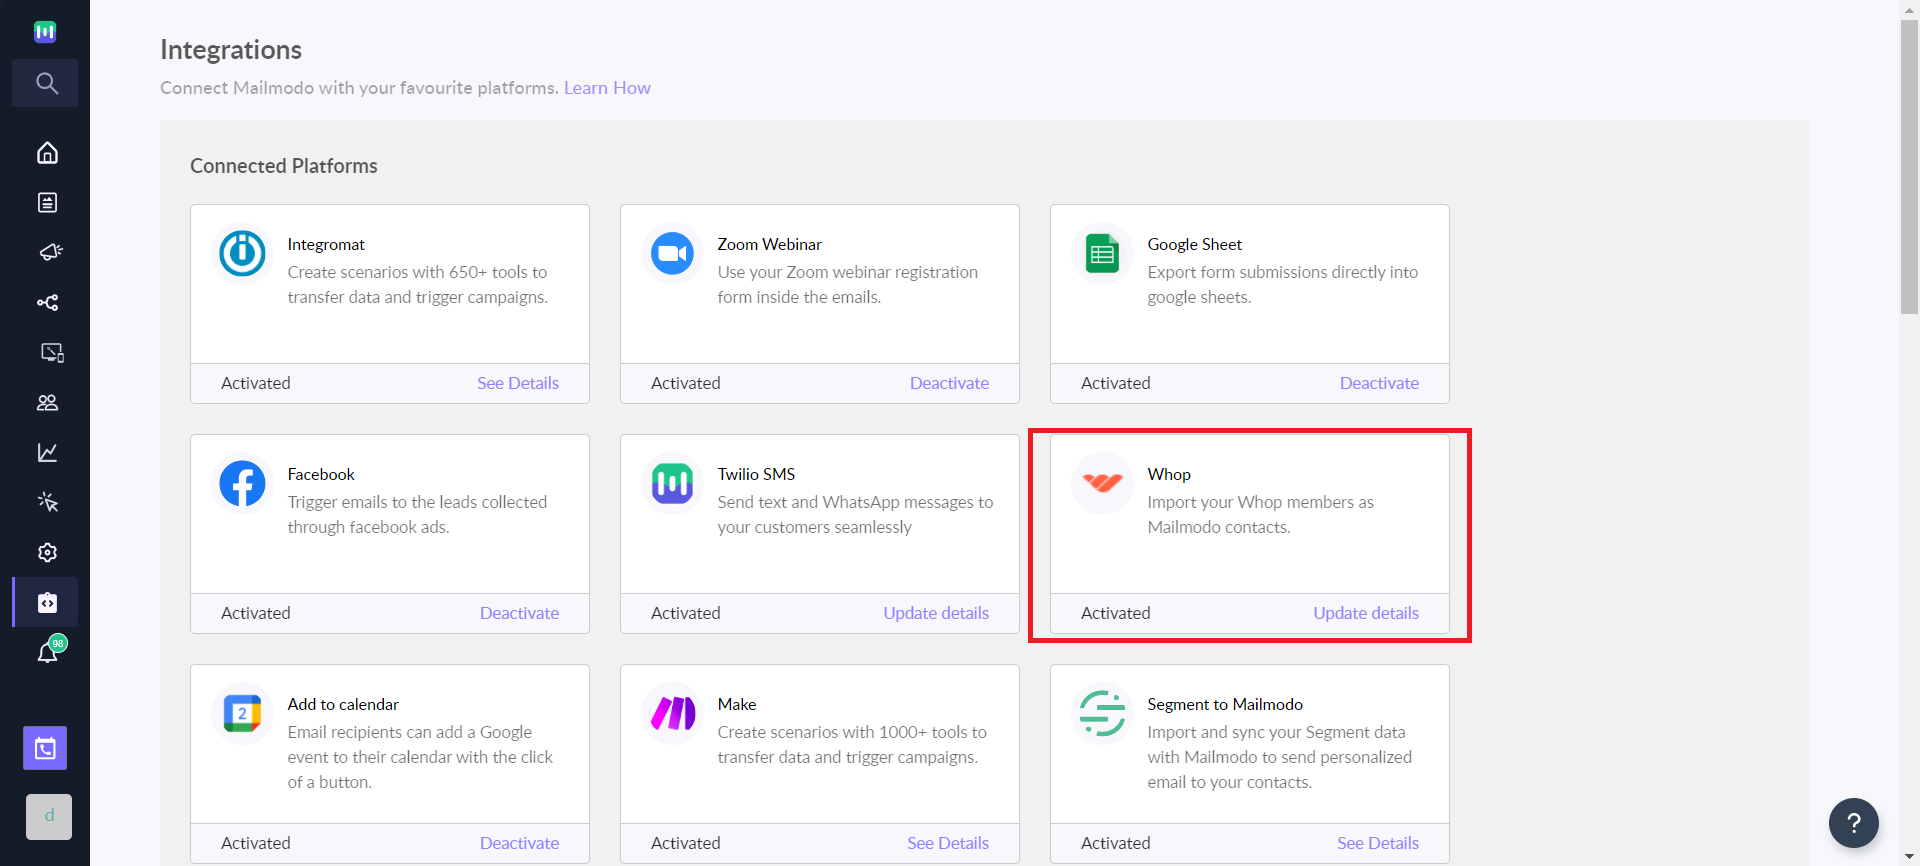
2. Enable Whop Integration
Integrating Mailmodo with Whop Marketplace will automatically sync Members in your Whop account as contacts into Mailmodo.
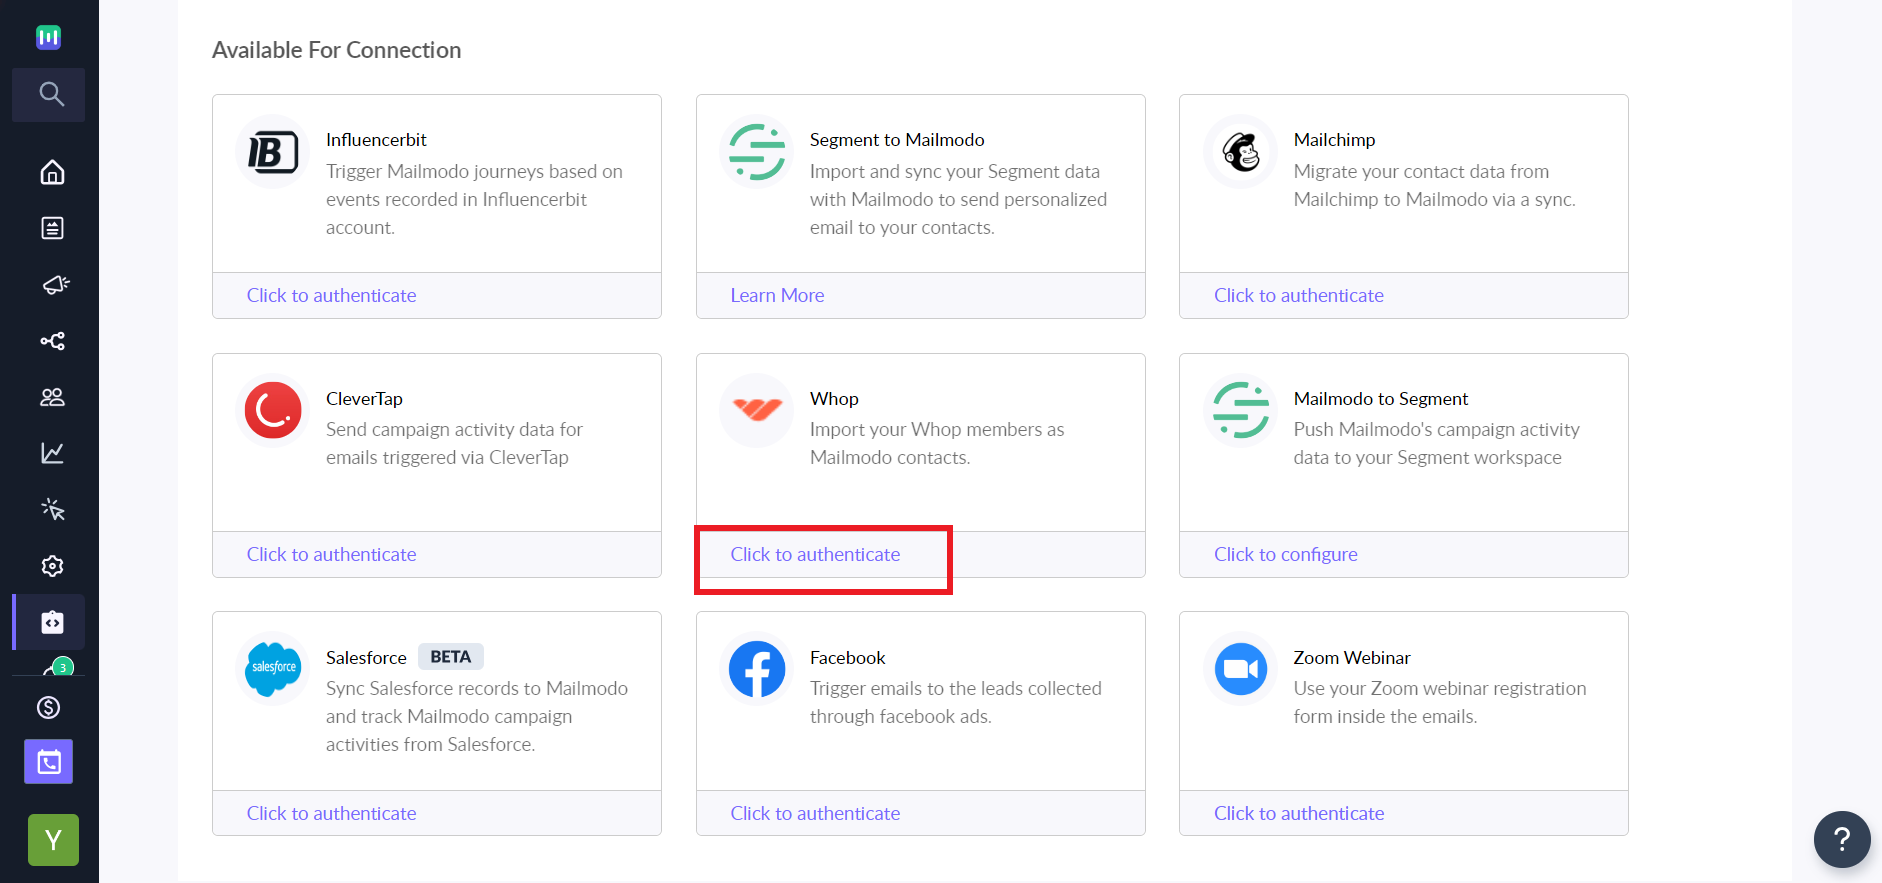
Step 1: Go to Integrations in Mailmodo and click on Click to authenticate on the Whop
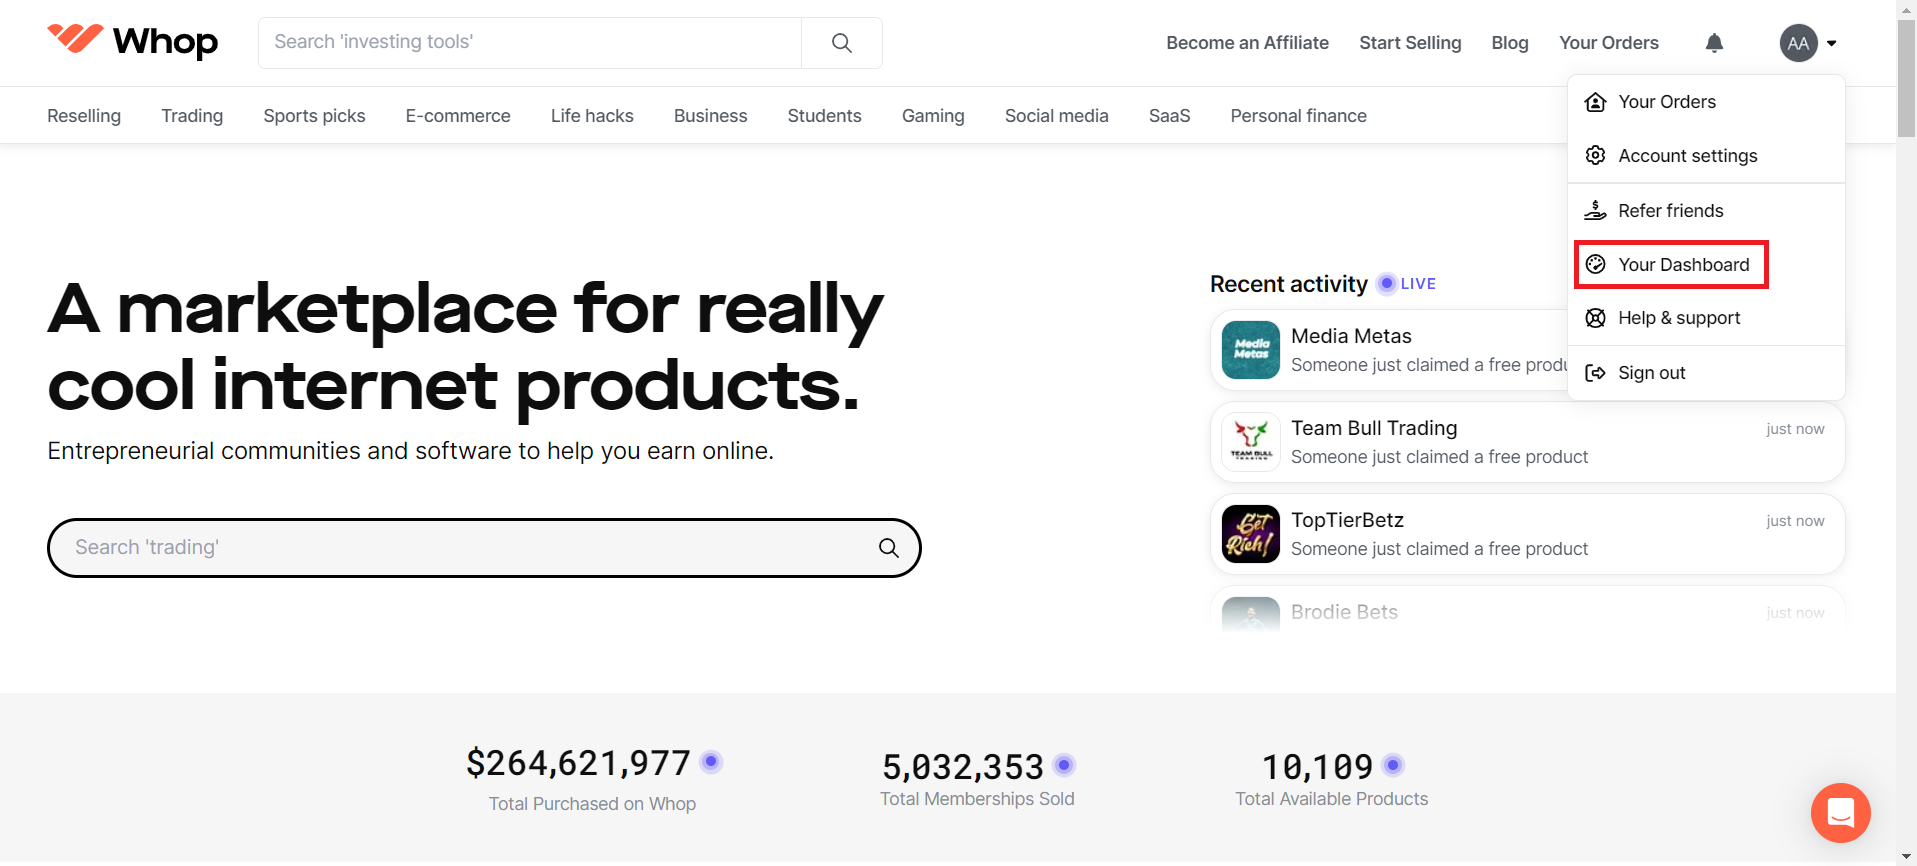
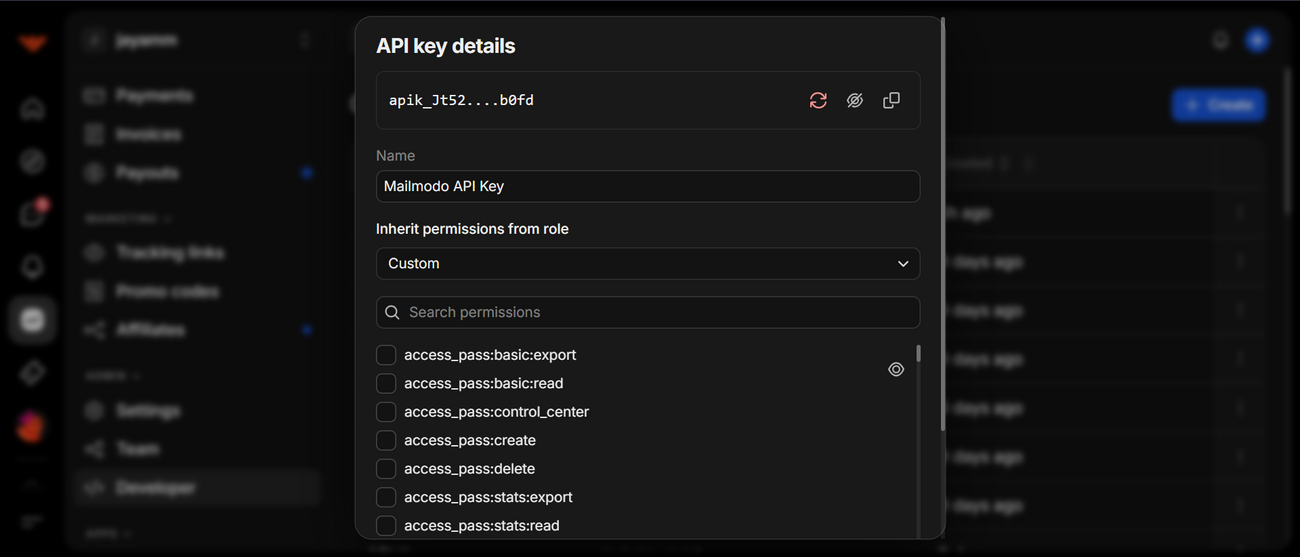
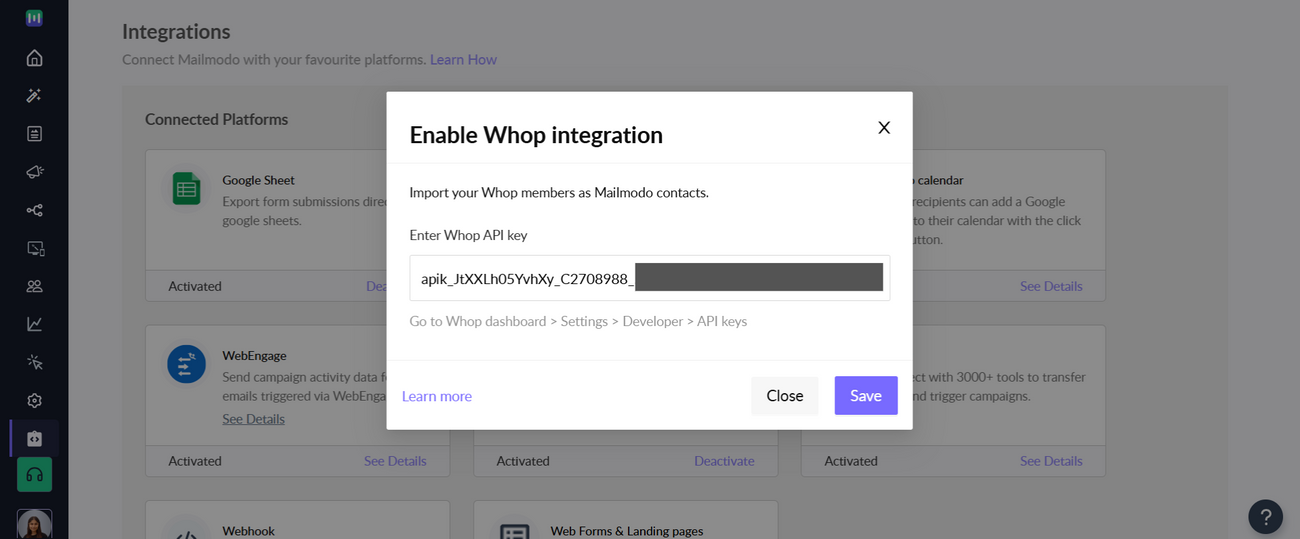
Step 2: For Whop API Key, Go to Settings > Developer > Company API Keys in the Whop Dashboard . In case you don't have an API Key generated, please use Create option to generate one.

Step 3: Click Save after entering your API Key. Viola! The API key will be saved, and the integration will be successfully enabled. Whop Integration will move to Connected Platforms.
⚠️ Please make sure, following permissions are provided while generating the API key: 1. access_pass:basic:read 2. company:authorized_user:read 3. company:authorized_user:email:read 4. company:basic:read 5. developer:manage_webhook 6. member:basic:read 7. member:email:read
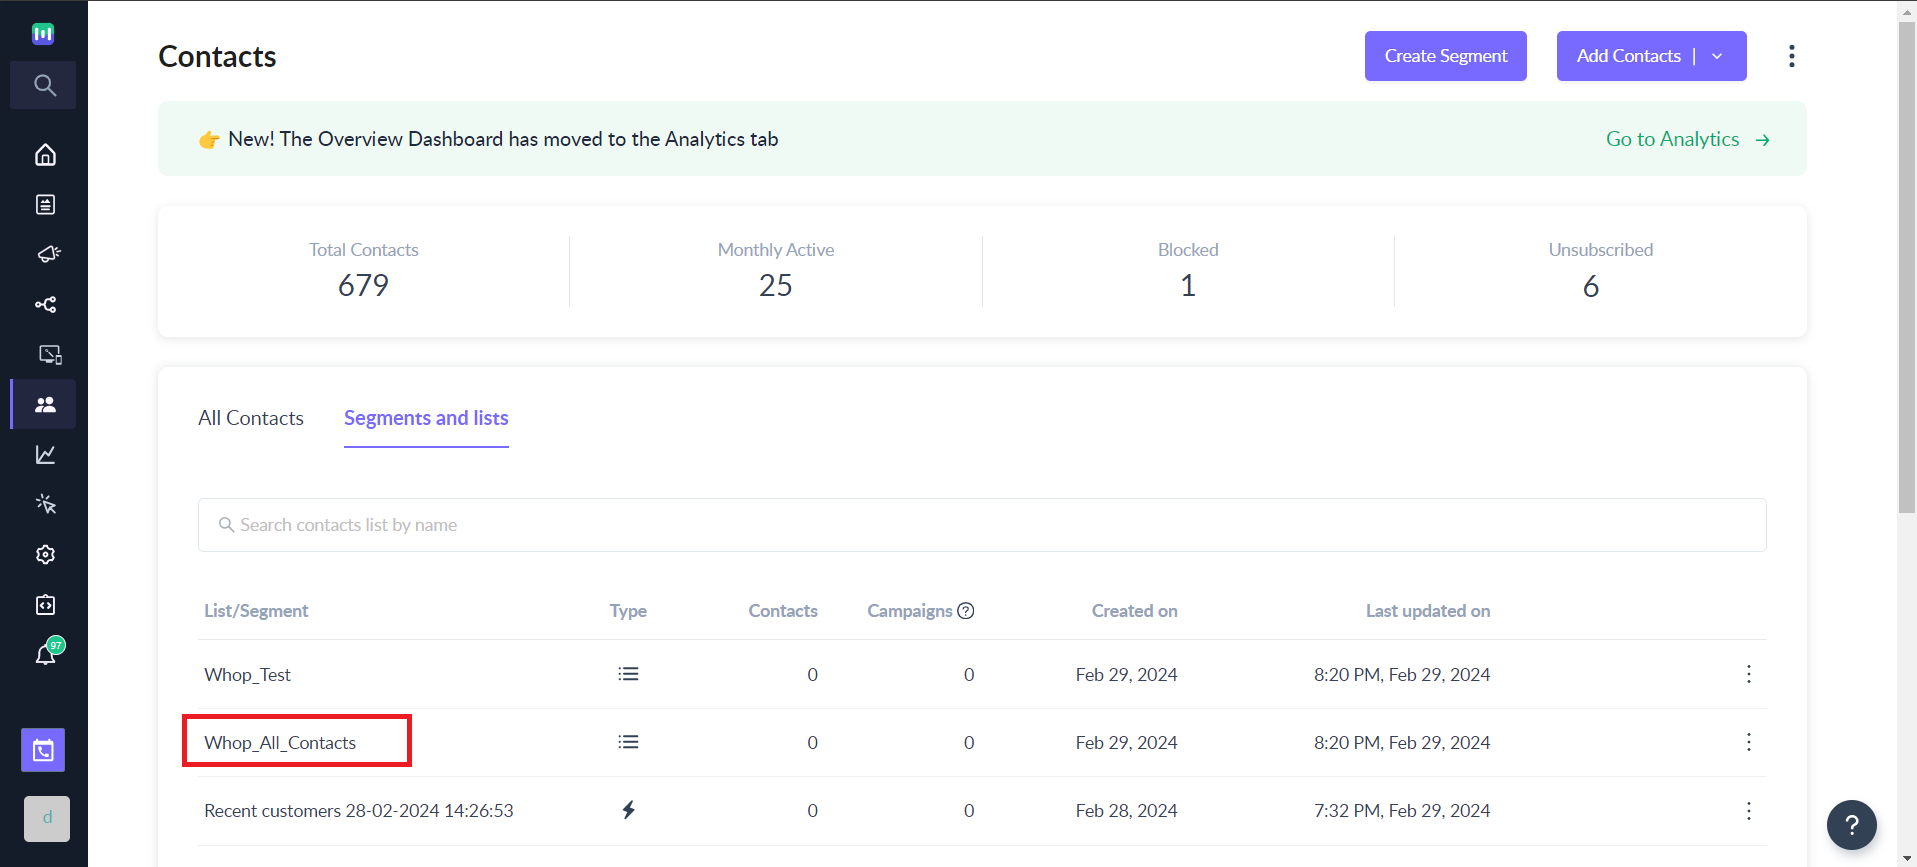
Step 4: Once the integration is enabled, all the Whop Members will be synced into Mailmodo. The same can be found in Mailmodo at Contacts > All contacts
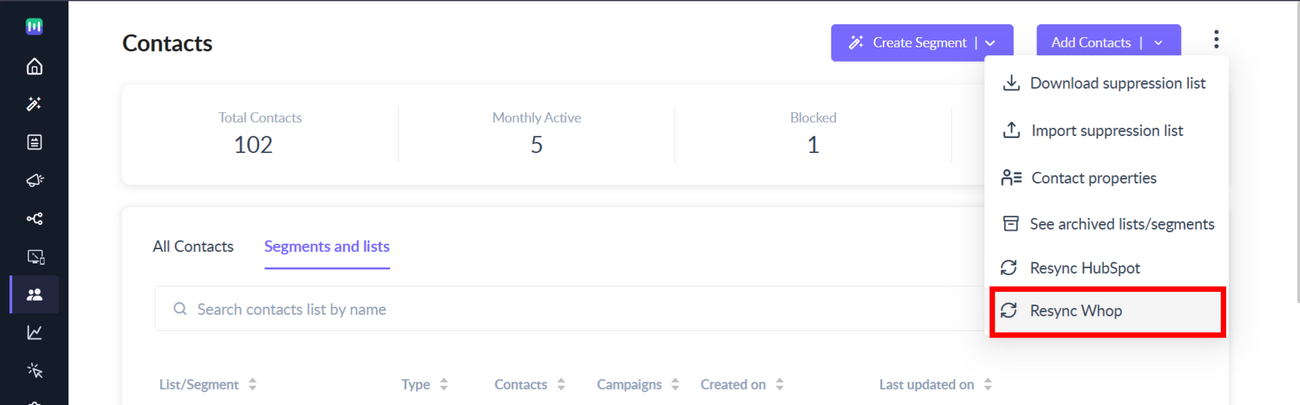
You can re-sync your HubSpot contacts under contacts page by clicking on the three dots -> Resync Whop.
Read this for a detailed explanation.
3. Invite Team Members
You can add team members to your Mailmodo account. Adding additional members will allow you to collaborate with your team members more efficiently and help with the initial setup.
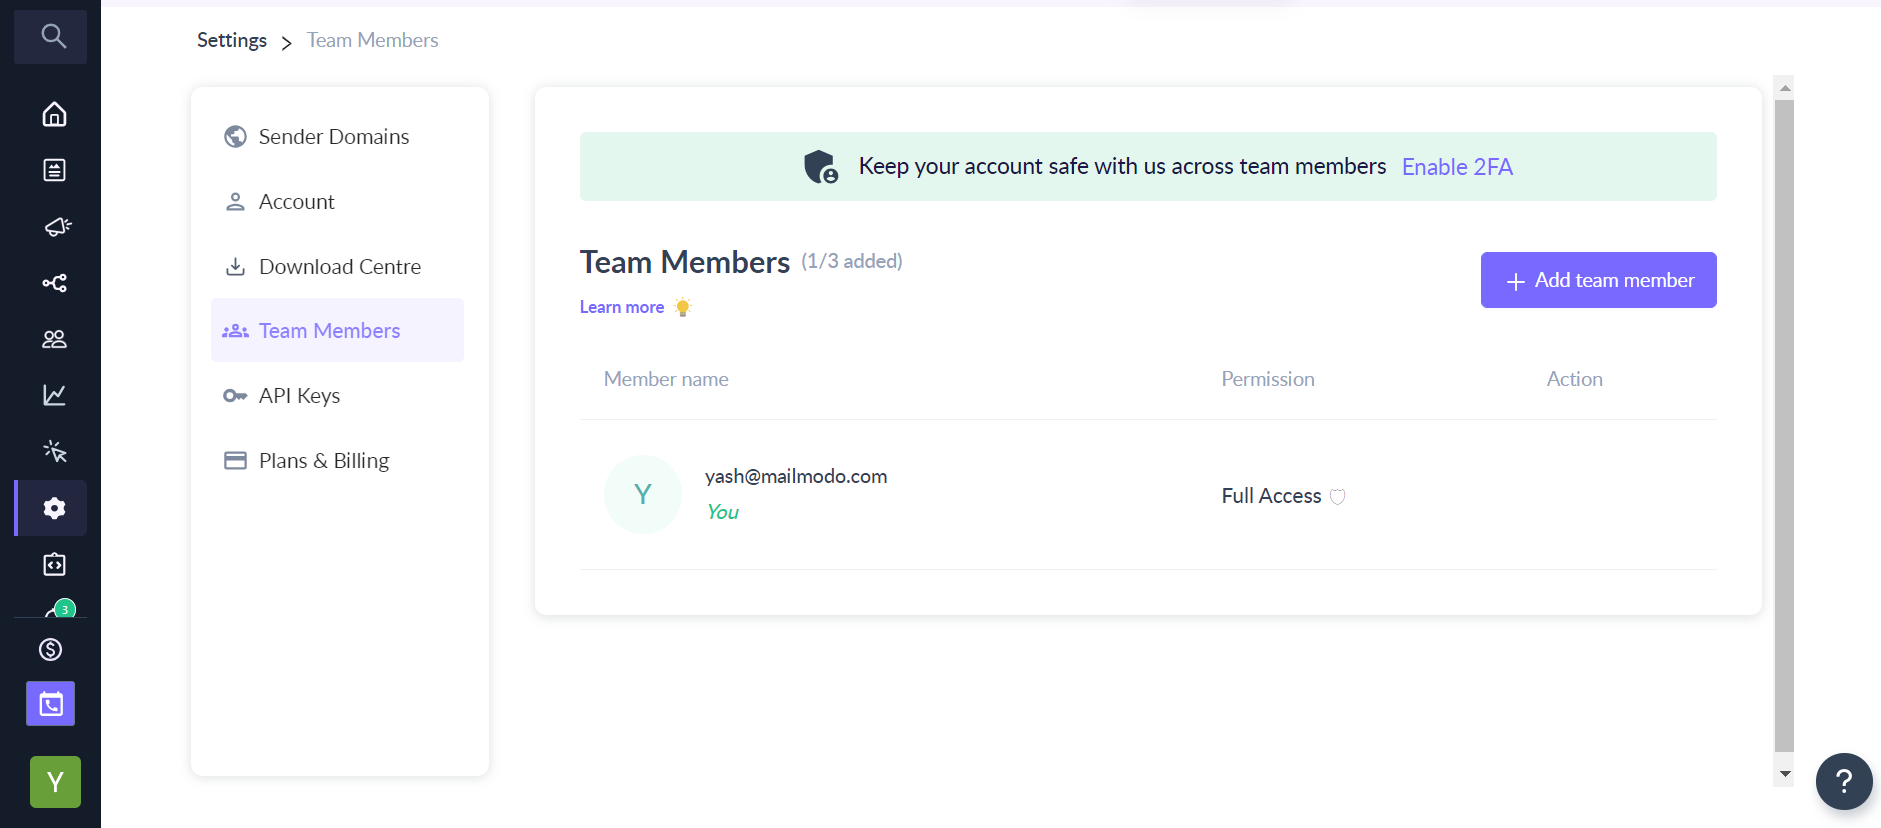
You can up to 3 team members to your account and two types of users can be added to your Mailmodo account:
- Full access users : They can perform all actions in the account.
- Limited access users : They can perform all actions in the account except downloading contacts, managing team members, and managing API keys. You can specify if a user will have limited access during the invitation.
Read this for a detailed explanation.
4. Import Your Contact and Users’ Data from Your Previous Email Service Provider
In addition to automatic syncing of Whop Members as contacts in Mailmodo configured above, you may want to import contacts from your previous email service provider if applicable.

You can import data like subscriber lists, custom events, create segmentation, upload your suppression list , etc. We suggest you import your data as it saves.
You can import data into Mailmodo using different ways like through CSV, API, or directly integrating and importing through apps like Zapier, HubSpot, Mixpanel, etc.
You can also segment the contacts you have imported. Segmenting contact lists allows you to divide your contacts into groups based on specific, shared characteristics. Segmentation lets you create a target audience and ensure your campaign reaches the right demographic.
For importing through CSV , you need to have a CSV file with all the detail you want to import. If you want to import using other tools, you can read these .
5. Create and Design the Template
Mailmodo’s no-code/low-code template editor lets you create templates as per your need without needing any expertise in coding. You just have to drag and drop the elements into the template. You can create various templates such as newsletter templates, promotional email templates, feedback email templates, etc.
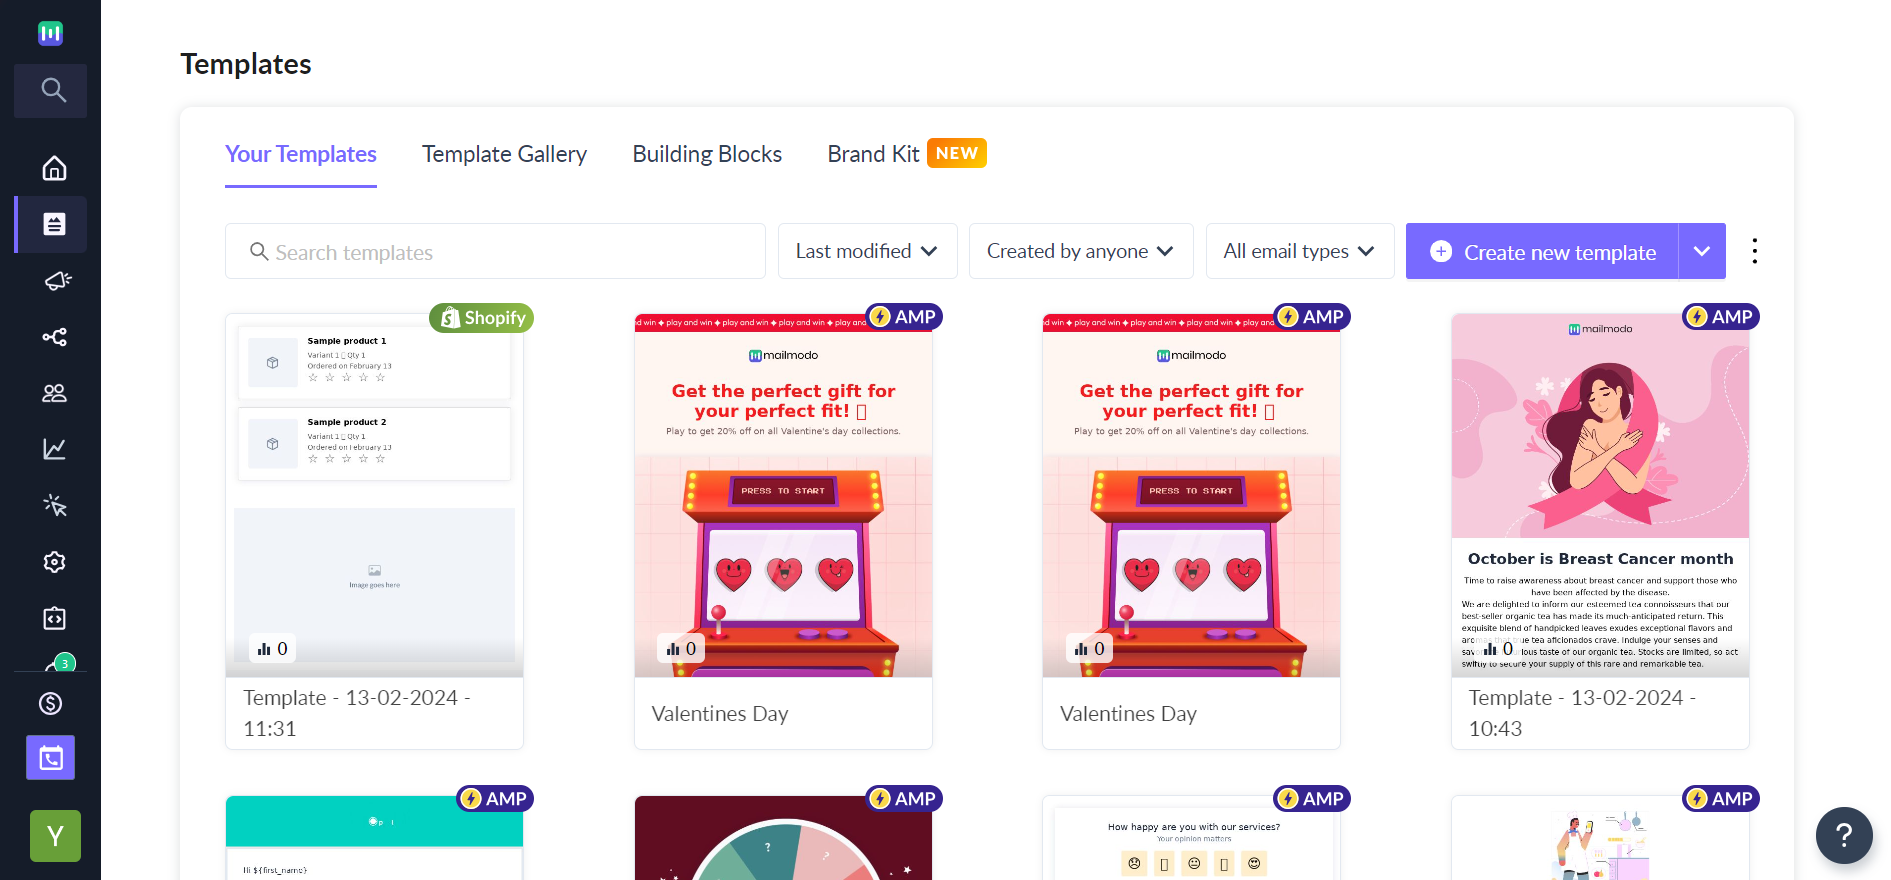
Mailmodo’s template also allows you to add different AMP widgets like Polls, Calendars, carts, Spin the wheel, Forms, etc. You can read these to find out how to add AMP widgets to your template. These widgets will help increase your engagement metrics.
The template editor also has options for personalization. You can add first name, last name, contact info., email, etc., in the template. You also have some pre-made templates to work with if you want to avoid making the whole thing from scratch.
When creating a template, don’t make the logo too big; always keep white space on the left and right and position it at the top. Also, keep the font size of 16 pixels at a minimum and 20 pixels for desktops.
Read this to learn more about the process of creating a template.
6. Set Up Your Custom Domain
Now it’s time to set up your custom domain. When you sign up for a new Mailmodo account, we automatically add a default sender email to your account. You can use this email to test the platform.
Step 1: Enter the sender's email address.

Step 2: Fill out the AMP form to get your sender email AMP whitelisted.
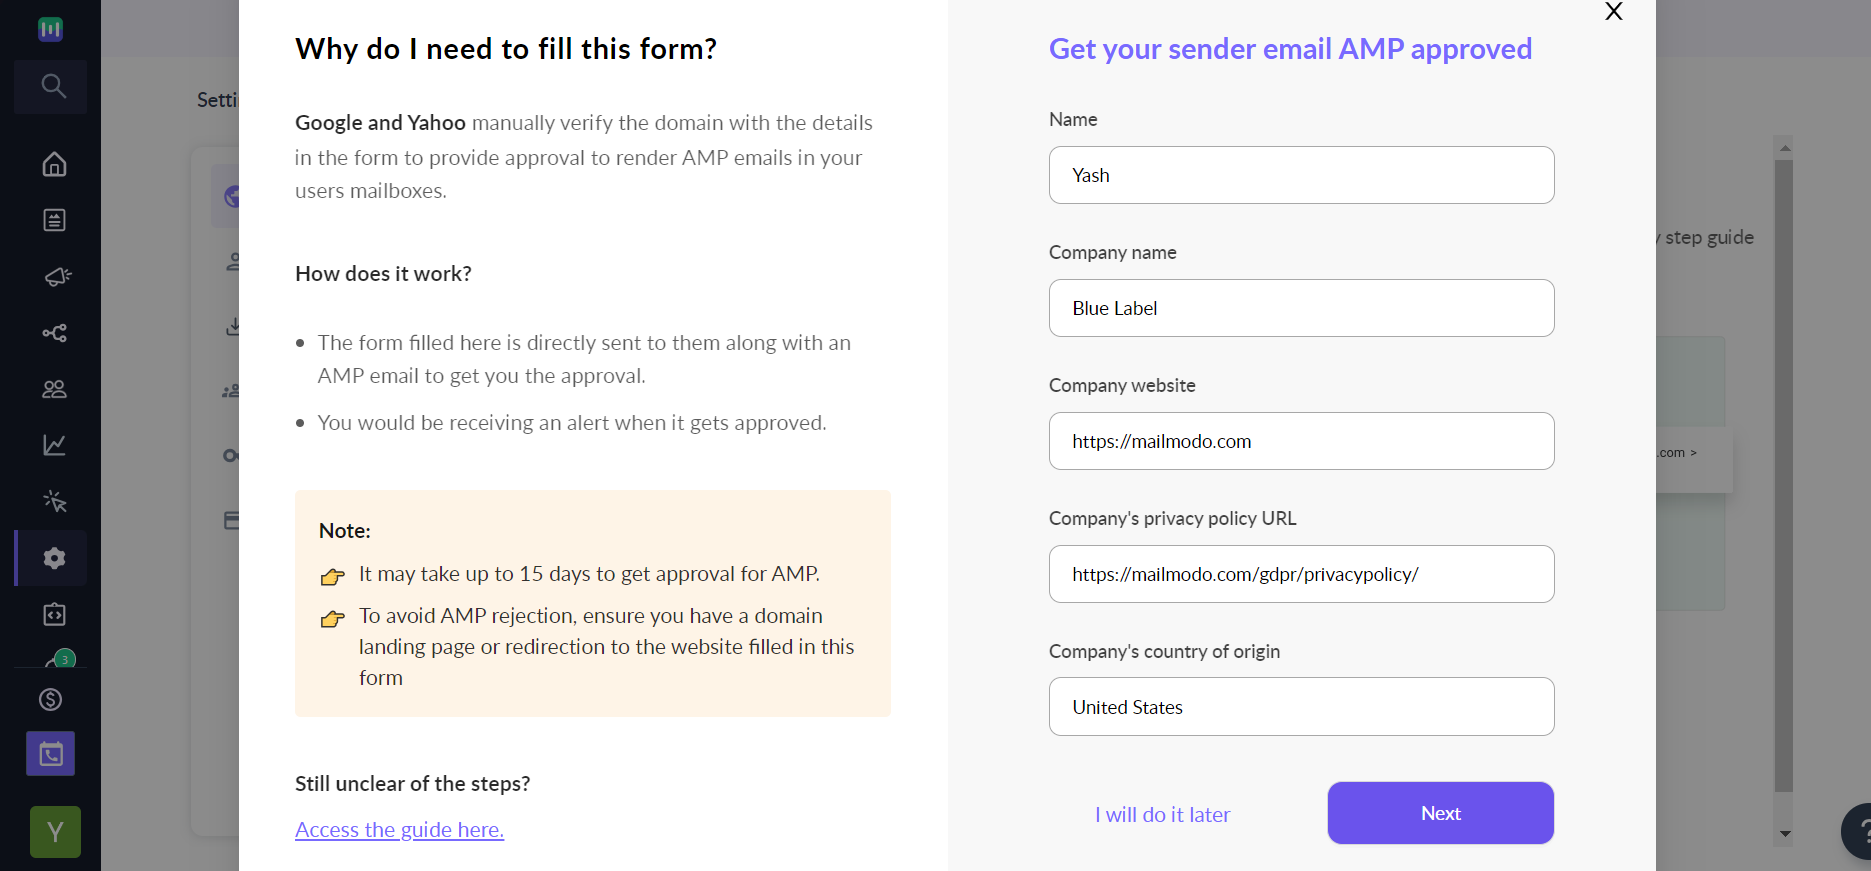
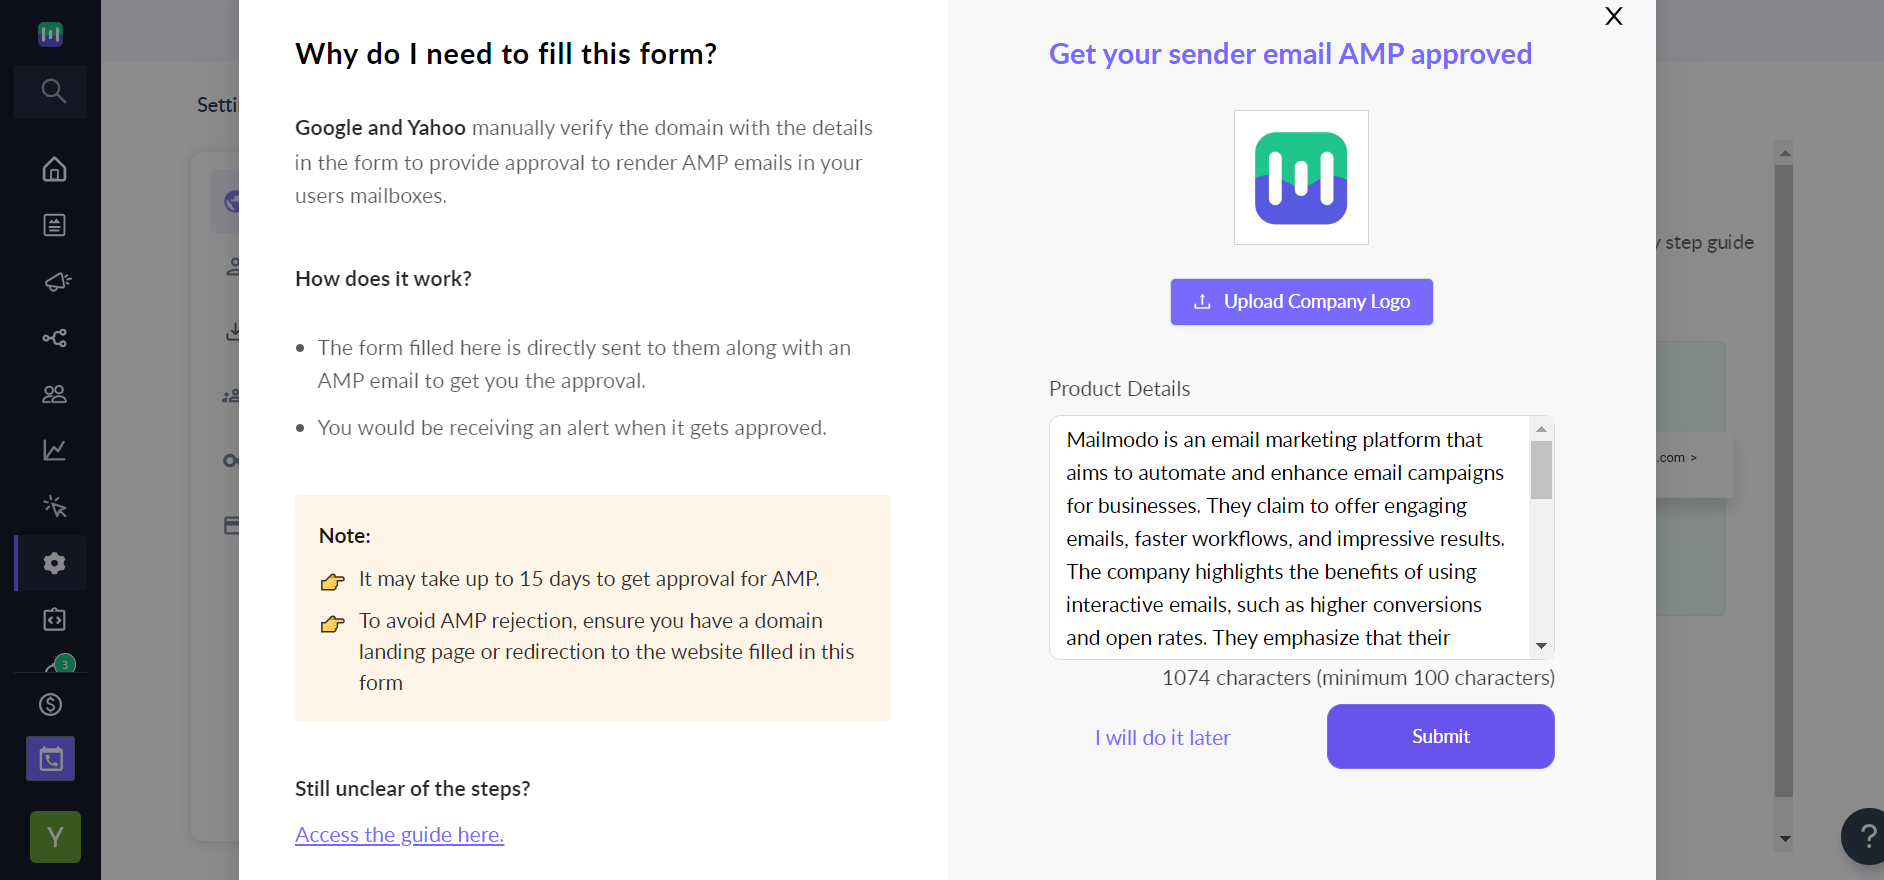
To send your actual campaigns with Mailmodo, you must add your own custom sender email address. For example, if your domain is ' www.abc.com ', the custom sender email address could be 'hey@abc.com.'
To set up a custom domain, go to the sender settings and enter the sender email. Then you have an option to select an email delivery service. After selecting one, a form appears, which you have to fill for it to be sent, requesting Google to whitelist your email address.
The approval process may take up to 7 days. You will get a confirmation email when it's completed. Once the email address has been whitelisted for AMP by Google, you will be able to send out dynamic AMP email campaigns through Mailmodo.
Once your custom domain is set up, start setting up Google Postmaster . It’s a tool that helps in managing the health of your email marketing platform .
Once the setup is complete, it would help you with points like:
- Spam rate
- IP reputation
- Domain reputation
- Authentication
- Encryption
- Delivery errors
To learn more about adding a custom domain, read this .
7. Send Your First Campaign
Now that you've figured out how to put up your segment definitions, it's time to send your first campaign.
You can either send a normal campaign or a transactional campaign.
A normal email campaign is one where you send it for marketing purposes like promotions, product updates, newsletters, discount offers, etc. A transactional email campaign is a campaign that gets triggered in response to a specific action taken by a user. For example, when you register for a webinar, the confirmation email you get is a transactional email. You registering for the webinar was a trigger in response to which you received the email.
After deciding on the above, you have to think about your message and target audience while planning your campaign, and what kind of a campaign it’ll be.
Below are a few examples:
- Product release
- Product updates
- Newsletter
- Welcome series email
- Sale announcement
- Festival discount
Once you’ve decided on the types of templates you’ll need, you’ll have to think of a good subject line that conveys what the email is about, a pre-header text that works with the subject line, from name, reply-to email in case the recipients have any queries or feedback.
And always send test campaigns to different clients to see if all the components are properly rendering everywhere or not.
Also, ensure that your sending domain is properly warmed up. If it’s not, your emails might land in the promotion folder or, worse, in the spam folder.
Use a campaign with high user engagement and low unsubscribes/complaints to warm up your domain. And try to use a non-time-sensitive campaign to make volumes and cadence more flexible. Also, start with your most engaged subscribers and gradually increase the volume (start with users that have opened/clicked a message in the past 30 days, then open up to 60-day actives and so on, until you’ve reached full volume).
You can read this to get started with creating a campaign.
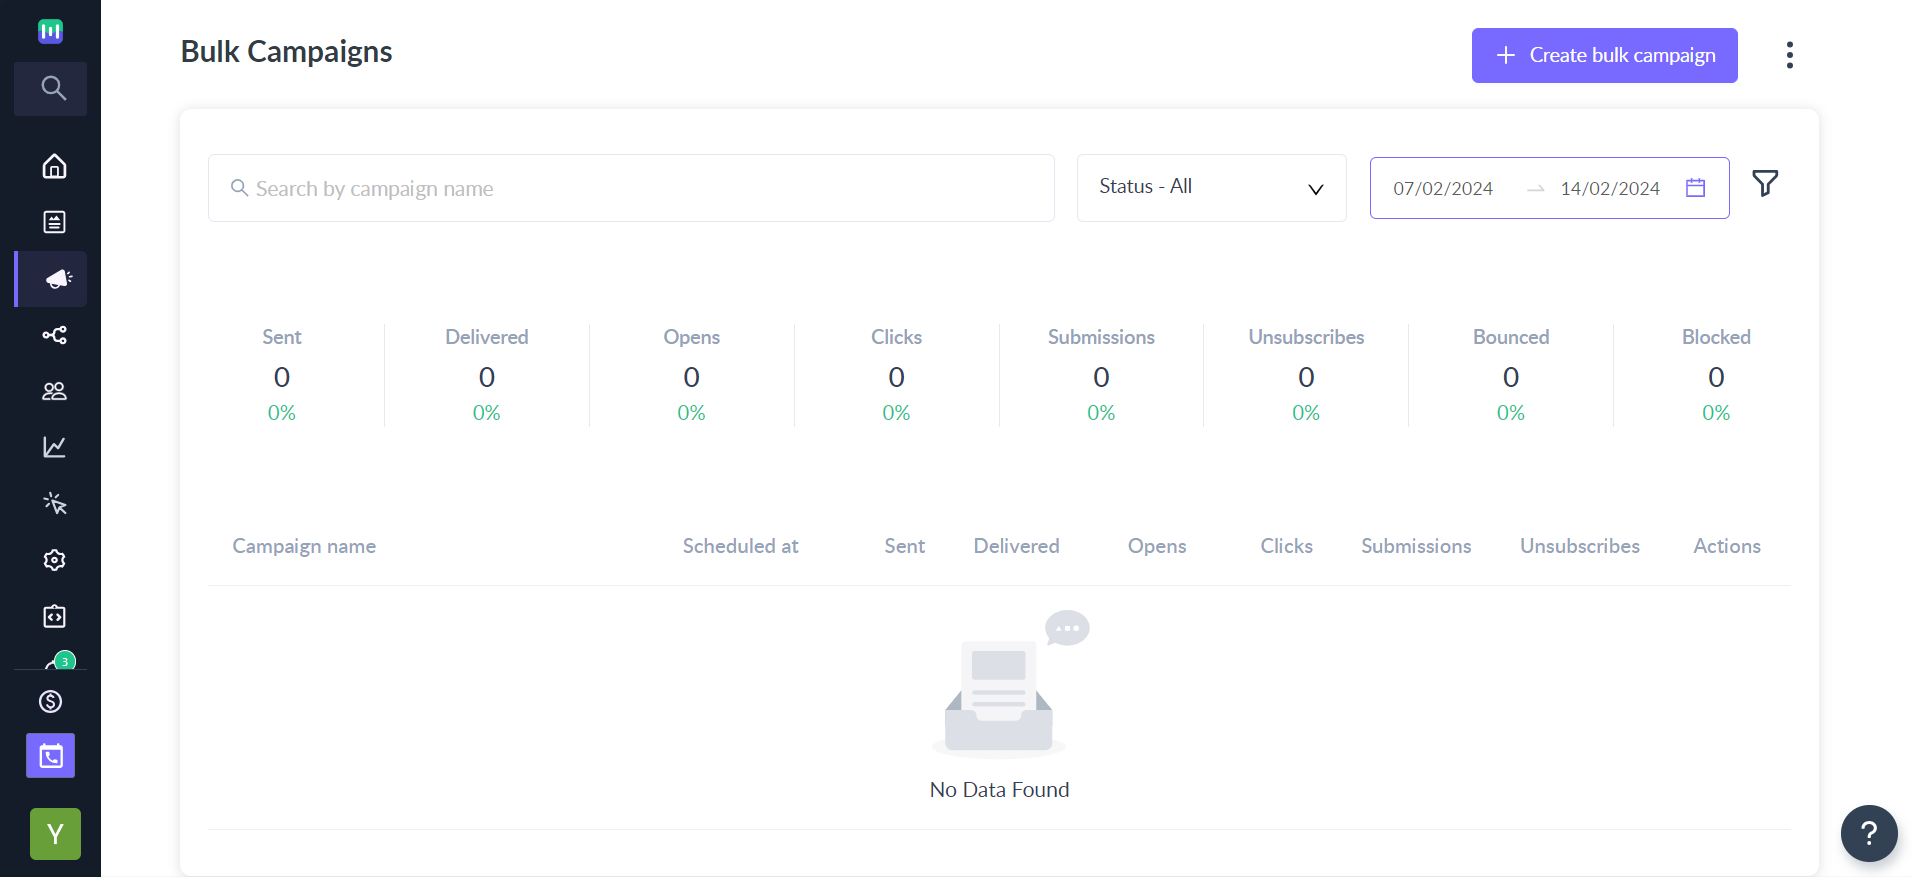
8. Analyze and Monitor Your Performance
Mailmodo offers a complete set of reporting tools to help you gauge how your campaigns are performing after sending them.
With our reporting tools, you can leverage a wide variety of data points to measure performance, discover what’s working and what isn’t, and discover if there’s room for improvement.
With Mailmodo, you can track no. of emails sent, no. of emails delivered, no. of opens, no. of clicks, no. submissions, no. of hard and soft bounce , etc., to monitor how your campaigns performed. All this data is also presented in a graph to help us visualize the performance of a campaign.
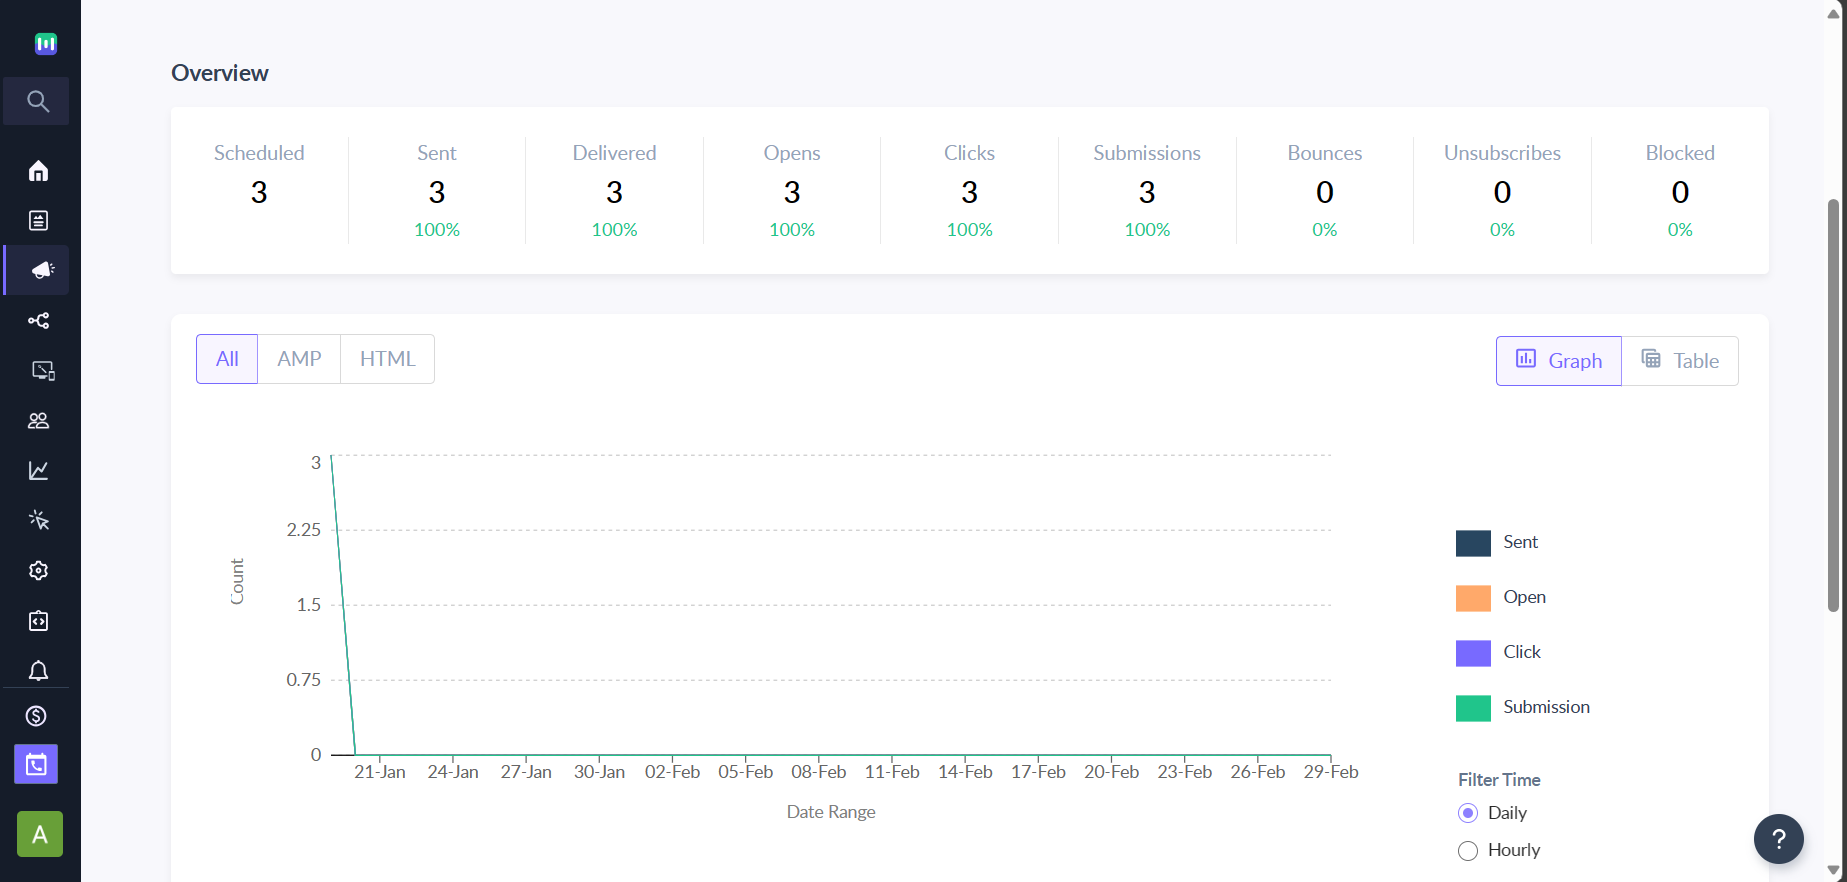
Moreover, you can also look at user data like no. of AMP opens, no. of HTML opens, no. of AMP clicks, submissions (feedback or queries) by users, etc.
9. Automate Your Workflows Using Journey
Journey (also known as autoresponders or drip campaigns) are powerful, automatic tools in Mailmodo that let you interact and customize your customers' experiences.
A flow is an automated sequence that begins with a trigger and continues with one or more steps. Flows can simply expand your business and cultivate strong customer loyalty.
Mailmodo’s drag-and-drop journey designer lets you design your workflows however you want. You can create and send an automated sequence of emails to your users in a few steps.

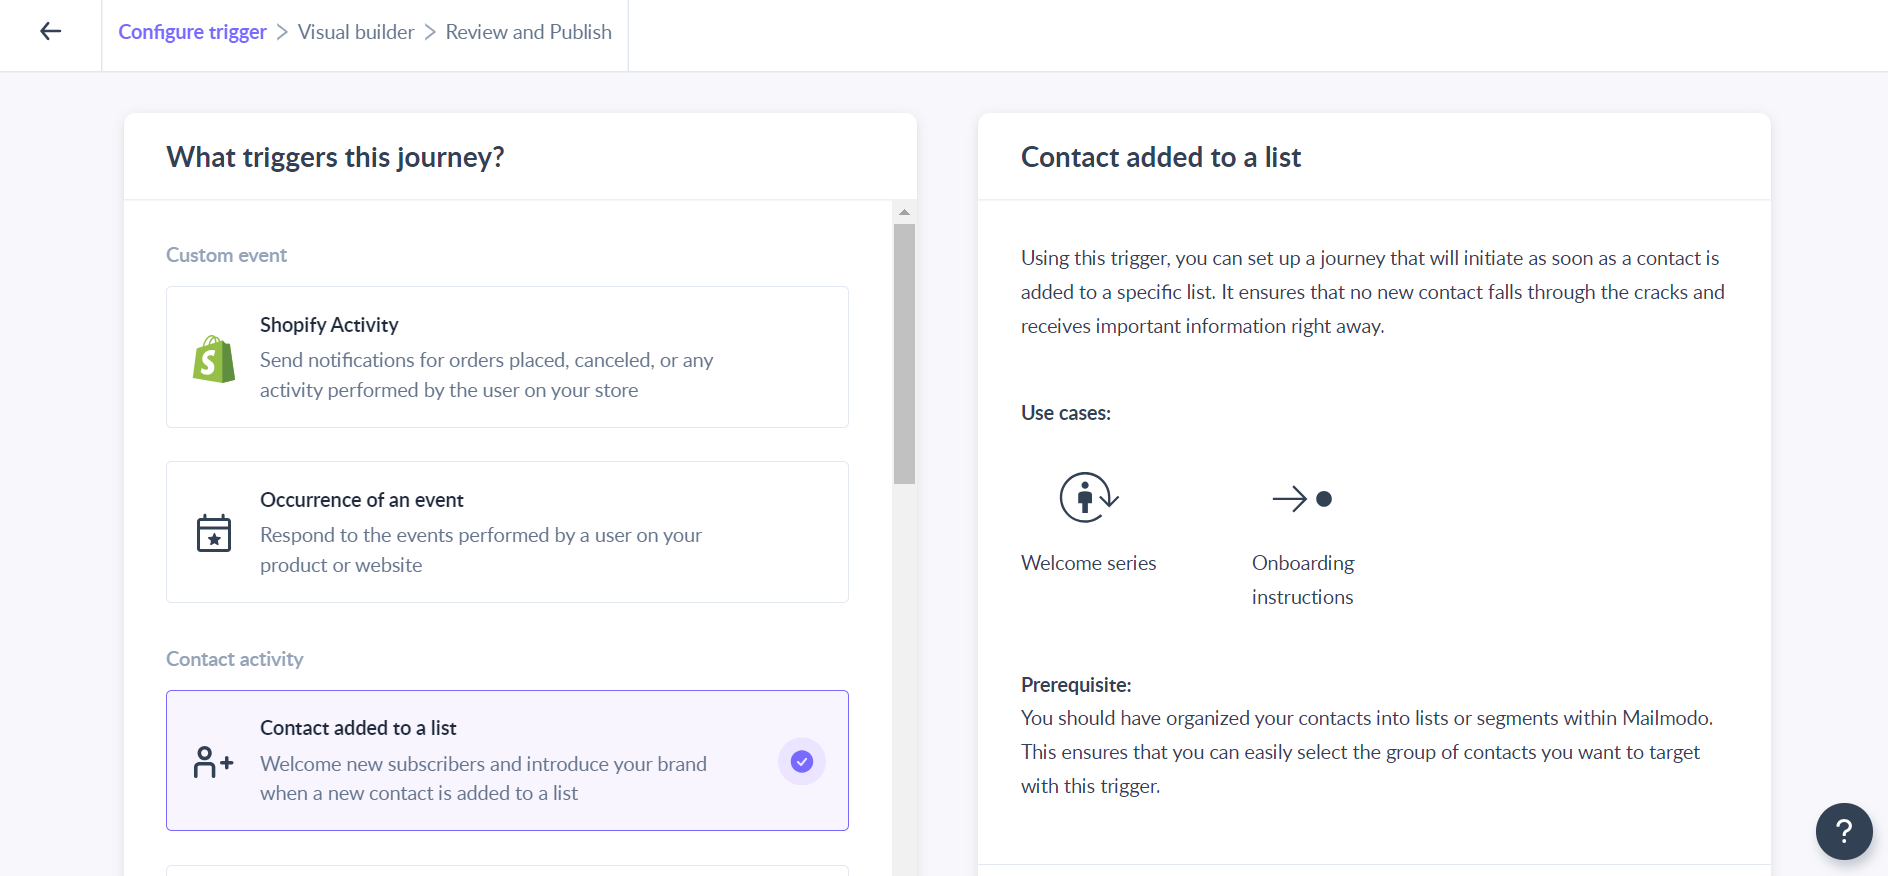
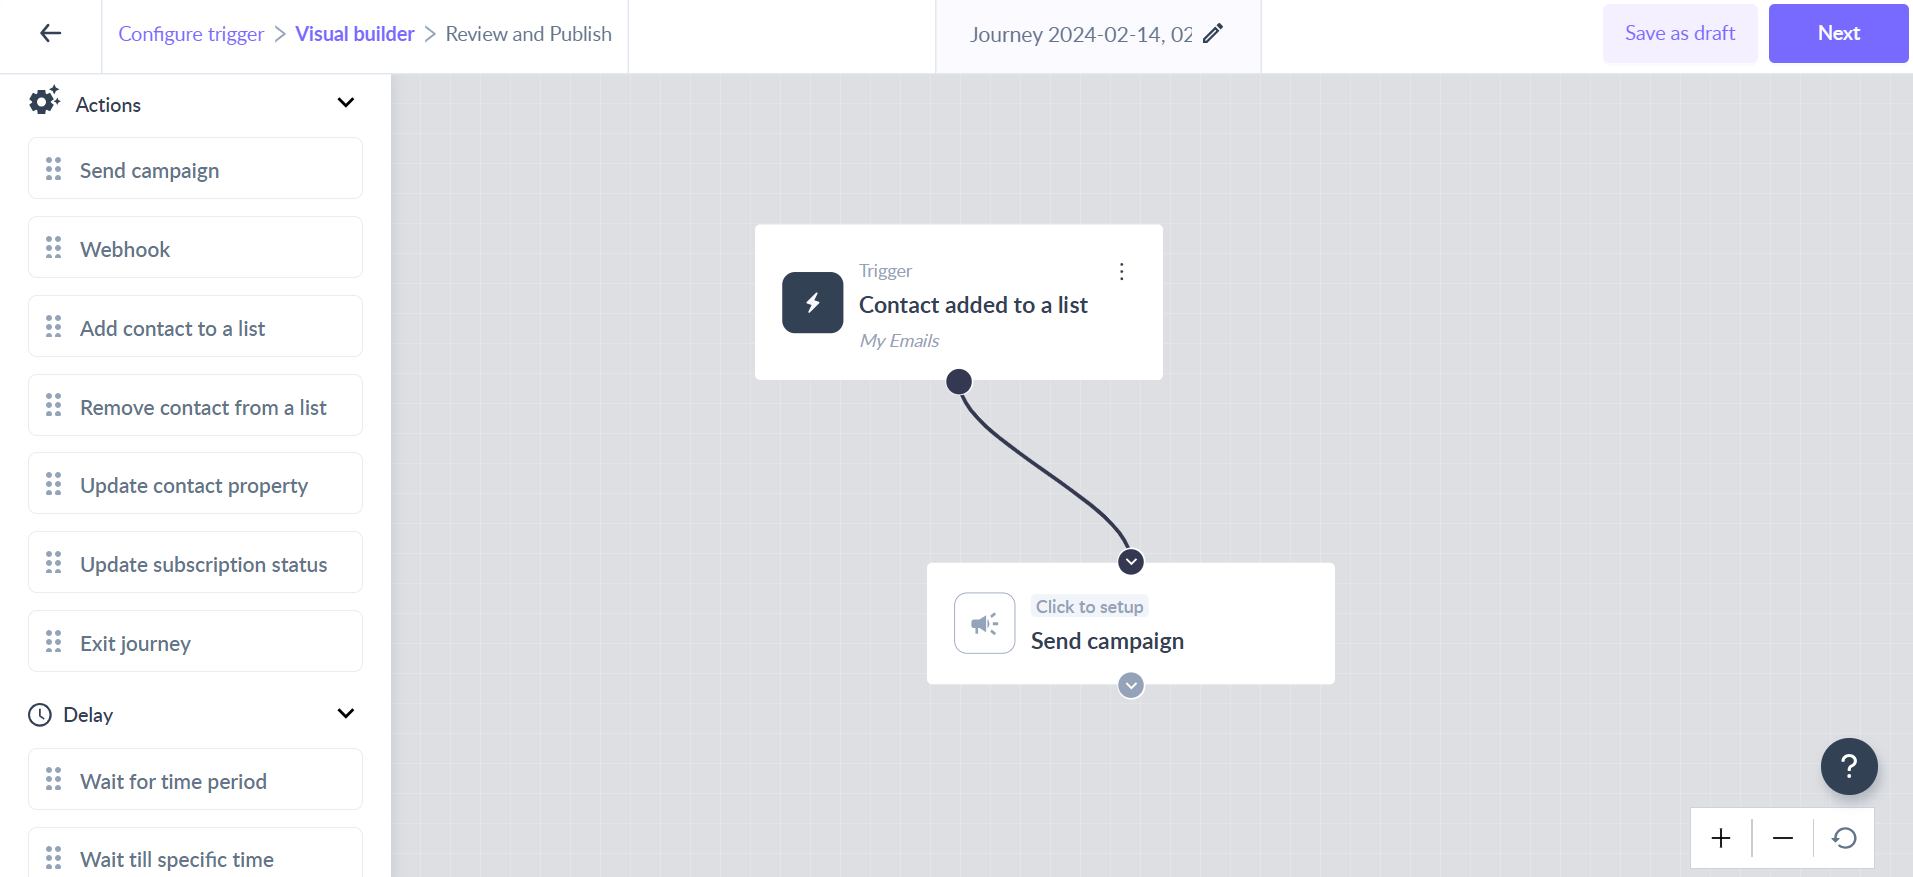
You can add conditions like open, click and form submissions. You can also send an email or trigger a webhook on each condition. With journey, you can trigger emails to multiple lists instantly at any time, along with tracking users through their journey.
The journey flow would depend on the context. A journey for an eCommerce platform would be different from a B2B SaaS platform. To get started with journeys, we suggest you read this .
If you face any problem then reach out to us at Mailmodo Support or share your thoughts at Mailmodo Product Feedback .