How to import contacts from Woorise to Mailmodo
Last updated January 11, 2024
Woorise is an online platform for creating contests, giveaways, surveys, and campaigns to engage audiences and grow businesses. It's user-friendly and helps design interactive campaigns without technical expertise, aiming to boost reach and customer engagement.
This guide shows how to link Woorise forms with Mailmodo using webhooks. It helps capture form submissions on your Woorise site in Mailmodo's database. You can start journeys or send bulk campaigns from the Mailmodo dashboard for these newly added lead data.
Step by step guide on how to integrate Woorise with Mailmodo
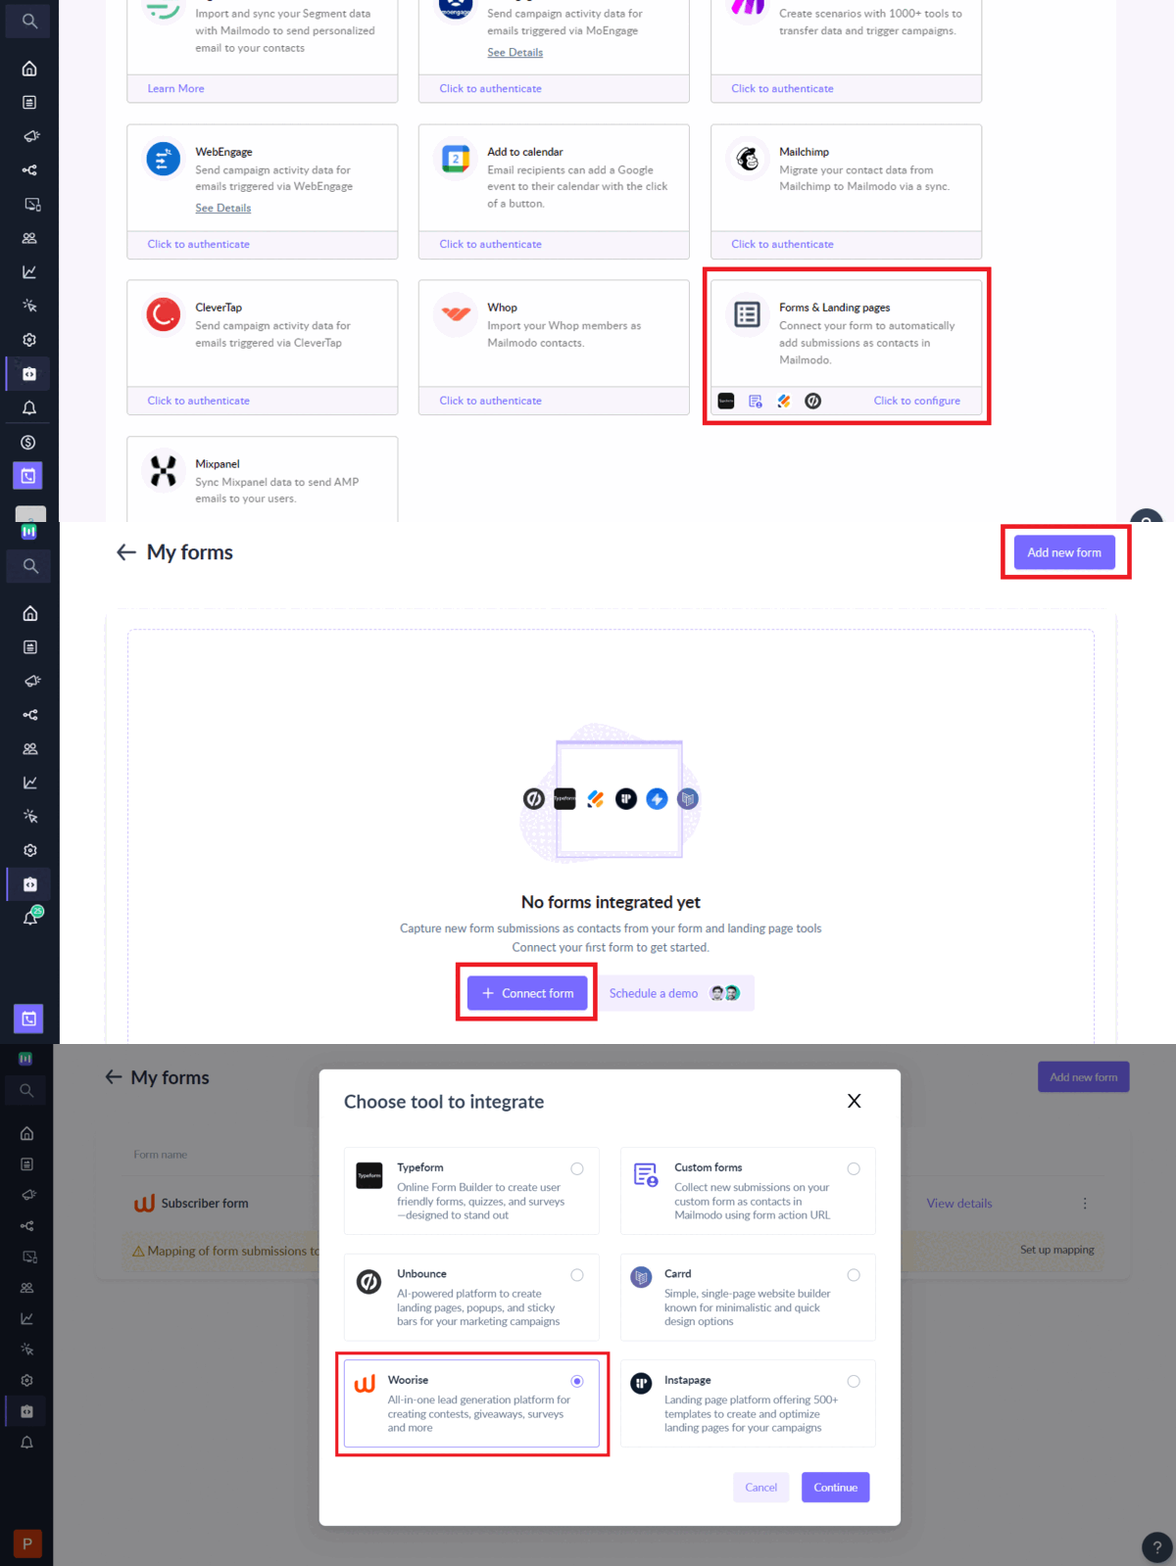
Step 1: [Mailmodo] Go to Integrations page and select Forms and landing pages → Add Form -> Select Woorise -> Click on Continue
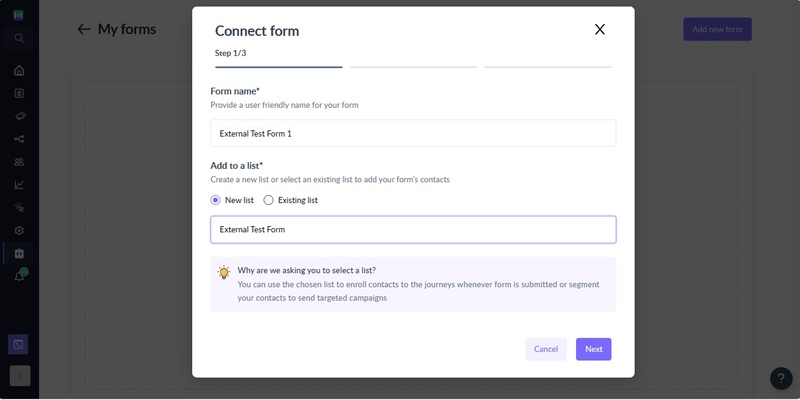
Step 2 : [Mailmodo] On the step 1 of the wizard, provide following details:
- Form name -> Provide a user-friendly name to uniquely identify the form.
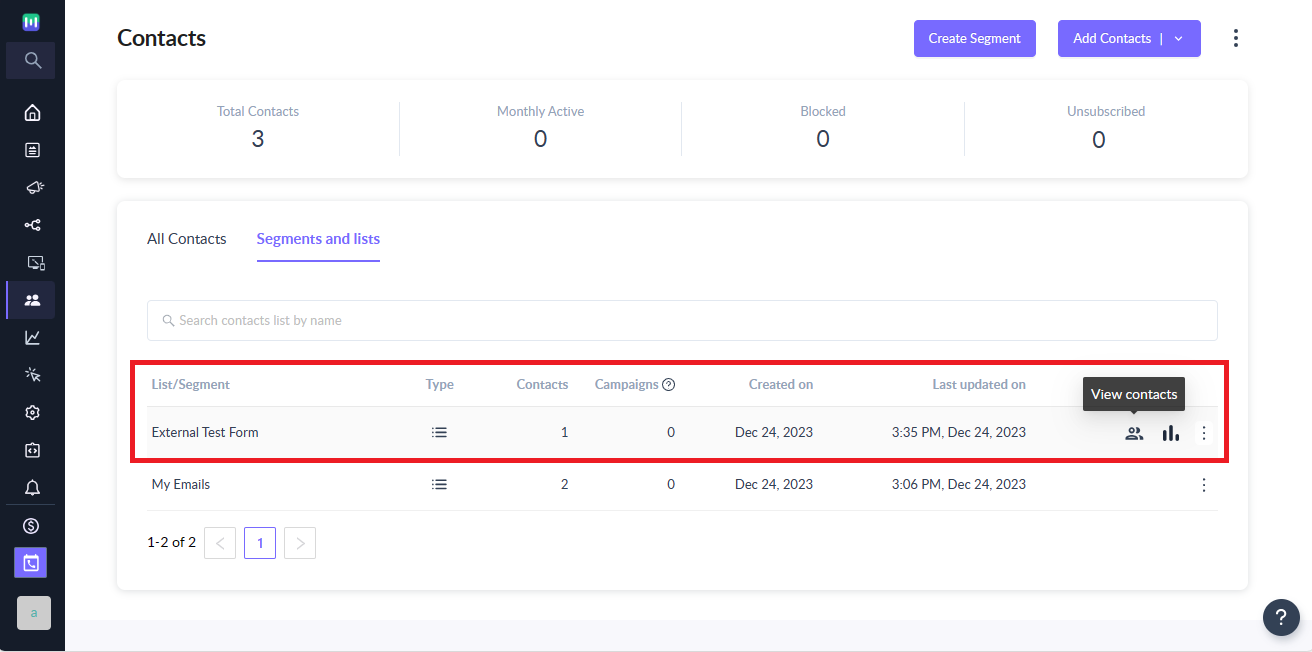
- Choose a list -> Whenever submission is made in Woorise, we will add the contact to a list in Mailmodo as well. You can either create a new list or use existing list for the Woorise submission.
You can use the chosen list to enroll contacts to the journeys whenever submission in made or segment your contacts to send targeted campaigns.
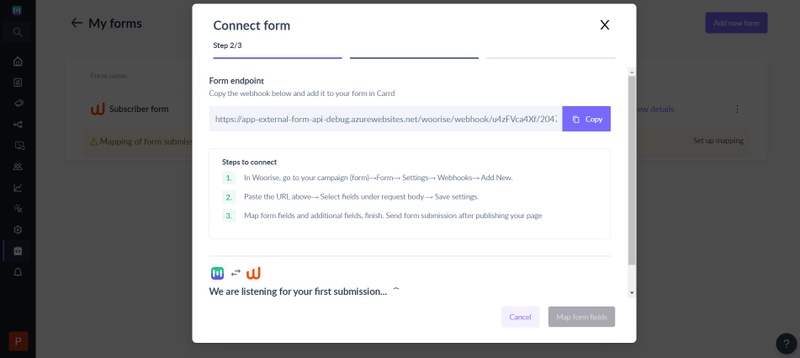
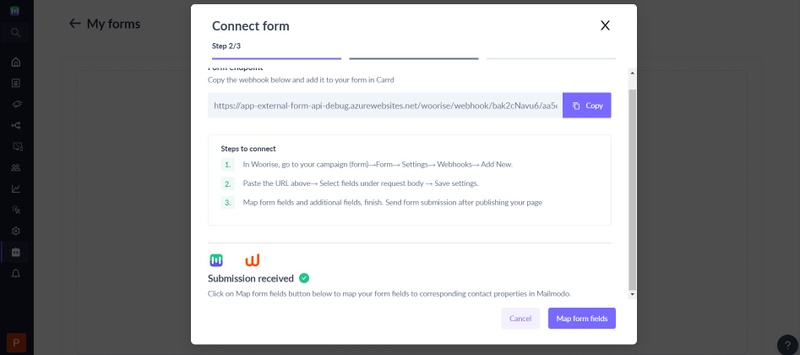
Step 3 : [Mailmodo] Click next and you will see the webhook endpoint which needs to be configured in your Woorise account. At this point, Mailmodo is waiting for a test submission to map the Woorise form fields with Mailmodo contact properties and complete the integration.
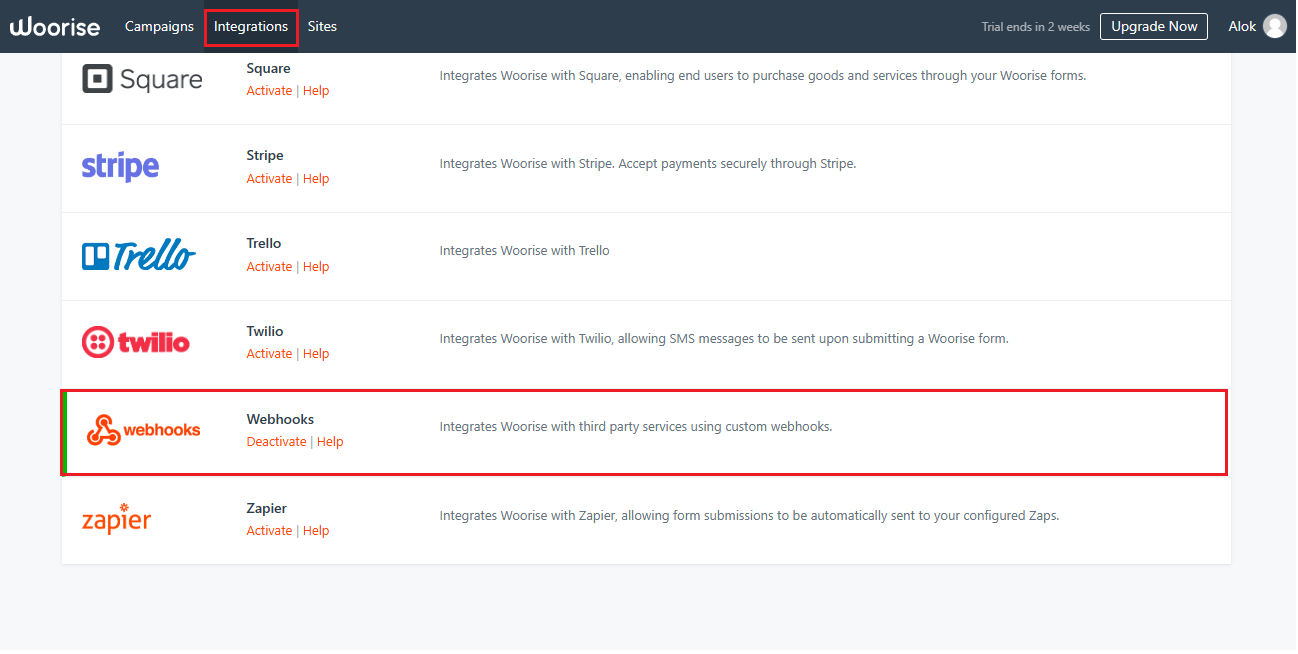
Step 4: [Woorise] In your Woorise dashboard click on Integrations from the main menu and activate Webhooks.
Step 5: [Woorise] Select your campaign in Woorise → Choose ‘Form’ → Settings → Webhooks
Step 6: [Woorise] Click on Add new. Add the end point from Step 3 in Request URL. Choose POST as Request Method and JSON as Request format.
Step 7: [Woorise] Under Request Body Choose ‘Select Fields’. Setup the fields which you want to send in the webhook request to Mailmodo.
You need to choose Select Fields option and explcitly setup fields for the webhook request. If you select 'All fields' within the request body then some of the fields may not be imported into Mailmodo.
Step 8: [Woorise] Save settings. Open your Woorise form in the web browser and send a test submission.
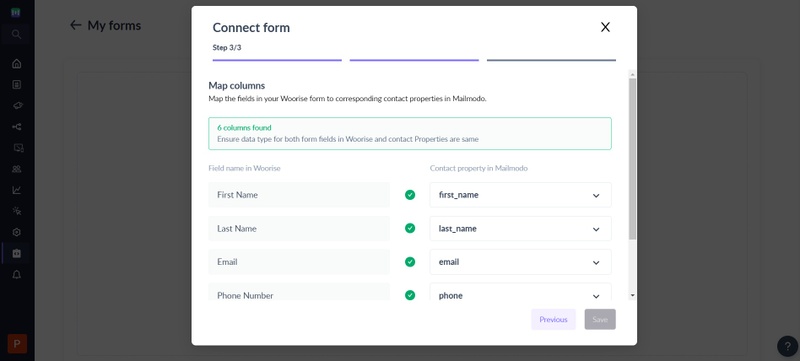
Step 9 : [Mailmodo] Once a test submission is received. You will have to map form field with contact property in Mailmodo
Step 10 : [Mailmodo] While mapping, you can choose to map form fields to existing contact properties or create new properties. Also, you can choose to not import the Woorise field as contact properties in Mailmodo.
Make sure each Woorise field in uniquely mapped to the appropriate data type in Mailmodo. For e.g. if you mapped Woorise date field to a string field in Mailmodo then it will be stored as string and not as date.
Step 11 : [Mailmodo] Once the mapping is complete, click on Save to complete the setup.
Save button will not be enabled until email address field is mapped.
Step 12: [Mailmodo] That's it. Once the form goes into Connected state, any new submissions on your Woorise page will be added as contacts in Mailmodo.
Contacts added to Mailmodo via Woorise will have Source set to Woorise.
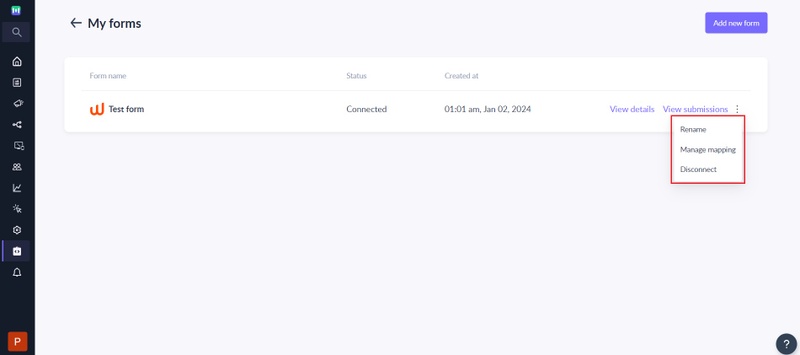
Step 13 : [Mailmodo] You can manage the connected form or view details about the imported contacts as per your needs.
It is recommended to create and connect a different form URLs for each landing page in your Woorise account to prevent any unforeseen issues.
Once contacts are added in your system you can enroll them in pre-built journeys in Mailmodo. Else, you can always create your own journey using this guide or send bulk campaigns to the collected contacts.
Frequently Asked Questions
I made the submission in Woorise but it is not reflecting as contacts in Mailmodo. What can be the reason?
If you are making submission in Woorise but they are not reflecting in Mailmodo then it can be due to the following reasons:
- Form is not in Connected state i.e. current state of the form is either submission pending or disconnected.
- Woorise submission doesn't have a valid email address.
- Woorise form has been edited after initial connection and now fields are not properly mapped in Mailmodo
- Webhook URL entered in Woorise is not mapping the endpoint for the form in Mailmodo
Why is the number of submissions in Woorise is not matching the contacts imported count in Mailmodo?
The number of submissions in Woorise may not match the number of contacts in Mailmodo due to the following reasons:
- Duplicate submission with the same email address is made. In such cases, contact properties in Mailmodo are updated with recent submissions.
- Submission didn't have a valid email address.
- Woorise form has submission prior to the integration setup -> Mailmodo doesn't sync form submission made prior to the connection.
I have edited the form for a landing page in the Woorise account. How do I change the form mapping in Mailmodo?
You will need to perform the following steps whenever you want to make changes to your Woorise:
- Publish the changes you want to make to your form in the Woorise landing page.
- Once published, open the updated Woorise landing page in the browser and make a test submission.
- Go to your Mailmodo account, click on the Manage mapping option for the connect form.
- You will see the latest submission available for mapping. Make changes as appropriate and click on Save.
- That's it. You have successfully updated the mapping. All new submissions will be imported to Mailmodo as per the new mapping.
Until you change the mapping, Mailmodo will continue to add or update contacts as per the mapping done previously. Any mismatch between the submission and mapped field will be ignored.
Can I use the same Mailmodo webhook endpoint URL in multiple forms in the Woorise landing page?
It is recommended to create a separate Mailmodo form (aka different endpoint) for each of your form in Woorise landing page.


